Wednesday, November 9, 2022

Sharding

 Introduction

Sharding is a type of database partitioning that separates large databases into smaller, faster, more easily managed parts. These smaller parts are called data shards. The word shard means "a small part of a whole."

Sharding involves splitting and distributing one logical data set across multiple databases that share nothing and can be deployed across multiple servers. To achieve sharding, the rows or columns of a larger database table are split into multiple smaller tables.

Once a logical shard is stored on another node, it is known as a physical shard. One physical shard can hold multiple logical shards. The shards are autonomous and don't share the same data or computing resources.


Horizontal sharding. 

When each new table has the same schema but unique rows, it is known as horizontal sharding. In this type of sharding, more machines are added to an existing stack to spread out the load, increase processing speed and support more traffic. This method is most effective when queries return a subset of rows that are often grouped together.

Vertical sharding. 

When each new table has a schema that is a faithful subset of the original table's schema, it is known as vertical sharding. It is effective when queries usually return only a subset of columns of the data.


Benefits of sharding

Sharding is common in scalable database architectures. Since shards are smaller, faster and easier to manage, they help boost database scalability, performance and administration. Sharding also reduces the transaction cost of the database.

Horizontal scaling, which is also known as scaling out, helps create a more flexible database design, which is especially useful for parallel processing. It provides near-limitless scalability for intense workloads and big data requirements. With horizontal sharding, users can optimally use all the compute resources across a cluster for every query. This sharding method also speeds up query resolution, since each machine has to scan fewer rows when responding to a query.

Vertical sharding increases RAM or storage capacity and improves central processing unit (CPU) capacity. It thus increases the power of a single machine or server.


Sharded databases also offer higher availability and mitigate the impact of outages because, during an outage, only those portions of an application that rely on the missing chunks of data become unusable. A sharded database also replicates backup shards to additional nodes to further minimize damage due to an outage. In contrast, an application running without sharded databases may be completely unavailable following an outage.


Difference between sharding and partitioning

Although sharding and partitioning both break up a large database into smaller databases, there is a difference between the two methods.

After a database is sharded, the data in the new tables is spread across multiple systems, but with partitioning, that is not the case. Partitioning groups data subsets within a single database instance.


Saturday, December 3, 2016

CAP Theorem

This theorem describes the behavior of a distributed system. A distributed system is a collection of interconnected nodes that all share data.

The CAP Theorem was first postulated by Dr. Eric Brewer back in the year 2000.  As per this theorem, you can get any two at any given time, but you cannot have all the below three attributes. You have to give up the third one for that particular pair of requests.


  1. Consistency: Consistency means that the system guarantees to read data that is at least as fresh as what you just wrote.
  2. Availability: availability means that a non-failing node will give the client a reasonable response within a reasonable amount of time. Now, all that's relative, but what that really means is that it won't hang indefinitely, and it won't return an error.
  3. Partition tolerance: Partition tolerance guarantees that a distributed system will continue to function in the face of network partitions. A network partition is a breaking connectivity. It means that nodes within the system cannot communicate with one another. A partition could be isolated to just the connection between two specific nodes or it could run through the entire network.


Explanation with an example... Write a new version of data to node X, and then we read that data from node Y.  Initially node Y has an older version of that data. So, there could three scenarios. 
  
  • Scenario #1:  Node Y could get the new version from node X. That could be node X sending it to node Y and waiting until it has confirmation from node Y before it sends confirmation back to the client or it could be that node Y goes and fetches it from node X, and it can only return to the client after it has fetched the data. In either case, the network must be functional for the new version to make it to node Y.  If the network is partitioned between nodes A and B, then node Y won't get the latest version. So, in this first scenario, this system is not being partition tolerant. So, let's suppose we want to guarantee partition tolerance.
  • Scenario #2: In the scenario node Y tolerates the partition and simply returns the best version that it has. So, in this case the client would get the older version of the data. This violates the consistency guarantee.
  •  Scenario #3:  In this scenario, we have to wait for messages to get from node X to node Y. So, either node Y will wait indefinitely while the network is partitioned or it'll time out and return an error. In either case, it's not being available.
 

Monday, April 27, 2015

Steps to create Case Manager client for Development purpose:

Create Case Manager VMWare client for Development purpose:

One of the biggest challenge for developing IBM products is setting up development environment. I spent several days to setup VMWare client which acts as development machine. In my case my VMWare will have just WAS, ICN and ICM installed. All other server side component like Design Object Store, Target Object Store, Repository, Security etc are deployed and configured in server.

Below are the high level steps on how to setup development box for Case Manager development


  • Update clean version of Windows 2012 with latest windows update.
  • Enter all required entries (all server details) in c:\Windows\System32\drivers\etc\hosts file.
  • Install WAS 8.5
  • Create profile  (development version) in WAS.
  • Login to WAS web console. Make sure Security --> Global Security section of local WAS matches with Development Server.
  • Export LTPA keys from server and import to local WAS
  • Install ICN 2.0.3
  • Install Case Manager 5.2.1.
  • Copy ICN Profile from Server. Typical path of the ICN profile is in C:\Program Files (x86)\IBM\ECMClient\configure\profiles\
  • Copy navigatorEar.ear file from server
  • Open the profile in Content Navigator Configuration and Deployment Tool in local VMWare. Update profile attributes with local WAS details. Deploy newly copied “navigatorEar.ear” file.
  • Copy ICM profile from Server. Typical location of the profile is C:\Program Files (x86)\IBM\CaseManagement\configure\profiles\
  • Copy “CaseBuilder.ear” and “CaseManager.war” files from server.
  • Open Case Manager Configuration tool. Update the profile properties with local WAS, local ICN and remove FileNet attributes. Run below tasks
    • Deploy the Case Manager API
    • Deploy Case Manager Builder
  • Restart WAS

Note: While create VMWare as case manager client, I had to do plenty of back and forth. The above steps are to the best of my knowledge.

Thursday, March 5, 2015

Datacap 8.1 - Branching

Create workflow:
Login to Task master web interface.
Click on "Administrator" menu.
Select "Workflow" option.
Click on application name. In below screen shot "Purchase Orders"
Click on "New" button.
Enter "Name" and "Description" values and click on "Apply" button


Add task to workflow:
Select newly created workflow. In below screen shot "SEM".
Click on "New" button.
Enter "Name", "Description" and other details as per below screen shot. In below screenshot "Verify" is new task.
Select appropriate program from "Program" dropdown.
Branching:
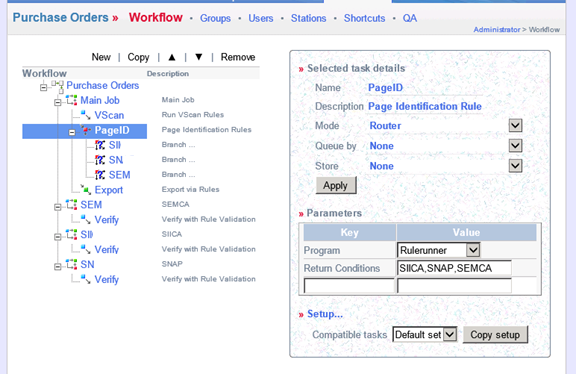
In the below example we are branching PageId task based on certain conditions.
Select task name (in this case PageId) which needs to be branched.
Select "Router" as mode.
Type comma separated workflow names to "Return Conditions".


Select each condition and set values similar to below screen shot.


Setting routing conditions in Datacap Model
Task_NumberOfSplits and Task_RaiseConditions are key custom actions here


--------------------------------------------------------------------------------------------------------------------------

Smart SQL Setup for Oracle - Datacap 8.1

  • Install Oracle client tools
  • Create folder if does not exists C:\app\<<UserId>>\product\11.2.0\client_1\network\admin
  • Copy  tnsnames.ora file to above folder with appropriate connection values.
  • Create TNS_ADMIN environment system variable and point to  C:\app\<<UserId>>\product\11.2.0\client_1\network\admin\
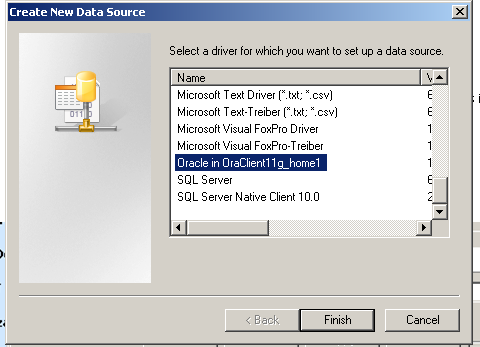
  • Create Oracle System DSN:
    • Open C:\Windows\SysWOW64\odbcad32.exe in Administrator mode.
    • Select “System DSN” tab.
    • Click on “Add” button.
    • Select “Oracle in OraClient11g_home1” driver


    • Enter required input values.
    • Click on “Test Connection” button. It would prompt for password.


  • Create DataSource in "Taskmaster Application Manager"
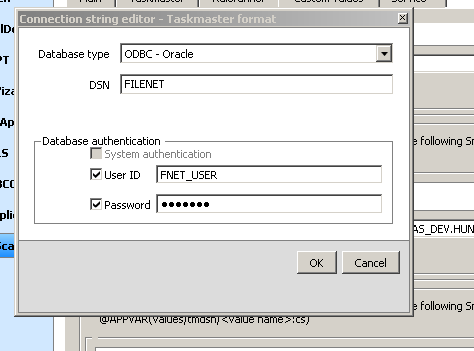
    • Click “Add New” in “Datasource Connection String Values in Taskmaster Format” section.
    • Enter required values in Connection String editor popup window.


  • Implement SmartSQL in Datacap model.


Datacap 9 Navigator Customization options


  • After Datacap app is created in Datacap Studio, most of the administrative activities can be performed through Web (ICN).
  • Datacap exposes RESTFull Web Services. So Customization opportunities are wide open.
  • Custom Panel:  It is data entry screen. Most of time we might want to customize this.
    • ICN allows us to design custom panels with in Datacap Admin desktop.
    • Good control on Layout of the Panel.
    • It provides all basic UI validations options like RegEx, Read-Only, Mandatory etc.
    • Dropdown field can be bound to SQL Query against database.
      • <SQL flist='CaseType dsn="*/lookupdb:cs">SELECT CaseType FROM CaseTypes</SQL>
  • External Data Services (EDS): Extend Custom Panel using EDS.
    • Using this we can get data from external data sources using web services.
    • UI fields properties and behavior can be controlled up to some extend
    • Enable Lookup values in dropdown box.
    • Prefil properties with default values based on ClassID, logged in user, parent folder etc.
    • Populate values based on other dropdown list.
    • Behaviour like readonly, mandatory, hidden.
    • Validation of properties
  • Custom Panel does not give us option to add new Action. This could be a significant hurdle for customization.
  • Since it is under Content Navigator platform, we can leverage all ICN customization options.

Tuesday, July 16, 2013

Export to Excel in Java


Export to Excel is one of the common feature in a typical web based application. There are many approaches to accomplish it. The approach which I am proposing does not need any third party library to export to excel. It used XML based excel file. Means it would be a plain text (xml). No need for any office API or third party API.

 Create a JSP page(ExportToExcel.jsp) for exporting data to Excel.  Source page will direct to ExportToExcel.jsp page.

Set appropriate Content Type and Header in ExportToExcel.jsp file.
response.setContentType("application/vnd.ms-excel");
        response.setHeader("Content-Disposition", "attachment; filename=ExcelFile.xml"); 
Output excel file would be ExcelFile.xml. You can change file name as per your need. However file extension should be "xml". Though it's extension is XML, window OS will treat it as Excel file based on the content of the file. We will see that below.
"attachment": this option will let user download excel file. If you choose to open excel file then change "attachment" to "inline".

Windows OS will treat xml file as excel based on  in XML content.
In the below example has 13 columns. All the rows are generated in for loop.