Thursday, March 5, 2015

Datacap 8.1 - Branching

Create workflow:
Login to Task master web interface.
Click on "Administrator" menu.
Select "Workflow" option.
Click on application name. In below screen shot "Purchase Orders"
Click on "New" button.
Enter "Name" and "Description" values and click on "Apply" button


Add task to workflow:
Select newly created workflow. In below screen shot "SEM".
Click on "New" button.
Enter "Name", "Description" and other details as per below screen shot. In below screenshot "Verify" is new task.
Select appropriate program from "Program" dropdown.
Branching:
In the below example we are branching PageId task based on certain conditions.
Select task name (in this case PageId) which needs to be branched.
Select "Router" as mode.
Type comma separated workflow names to "Return Conditions".


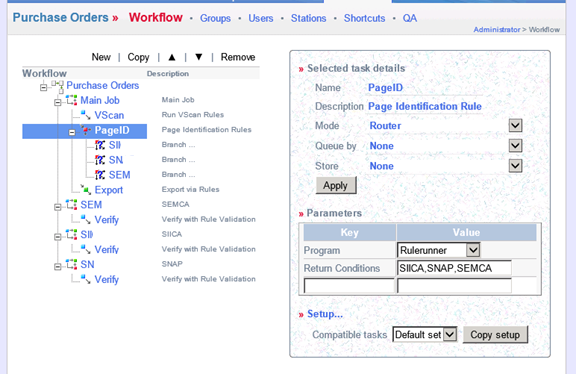
Select each condition and set values similar to below screen shot.


Setting routing conditions in Datacap Model
Task_NumberOfSplits and Task_RaiseConditions are key custom actions here


--------------------------------------------------------------------------------------------------------------------------

Smart SQL Setup for Oracle - Datacap 8.1

  • Install Oracle client tools
  • Create folder if does not exists C:\app\<<UserId>>\product\11.2.0\client_1\network\admin
  • Copy  tnsnames.ora file to above folder with appropriate connection values.
  • Create TNS_ADMIN environment system variable and point to  C:\app\<<UserId>>\product\11.2.0\client_1\network\admin\
  • Create Oracle System DSN:
    • Open C:\Windows\SysWOW64\odbcad32.exe in Administrator mode.
    • Select “System DSN” tab.
    • Click on “Add” button.
    • Select “Oracle in OraClient11g_home1” driver


    • Enter required input values.
    • Click on “Test Connection” button. It would prompt for password.


  • Create DataSource in "Taskmaster Application Manager"
    • Click “Add New” in “Datasource Connection String Values in Taskmaster Format” section.
    • Enter required values in Connection String editor popup window.


  • Implement SmartSQL in Datacap model.


Datacap 9 Navigator Customization options


  • After Datacap app is created in Datacap Studio, most of the administrative activities can be performed through Web (ICN).
  • Datacap exposes RESTFull Web Services. So Customization opportunities are wide open.
  • Custom Panel:  It is data entry screen. Most of time we might want to customize this.
    • ICN allows us to design custom panels with in Datacap Admin desktop.
    • Good control on Layout of the Panel.
    • It provides all basic UI validations options like RegEx, Read-Only, Mandatory etc.
    • Dropdown field can be bound to SQL Query against database.
      • <SQL flist='CaseType dsn="*/lookupdb:cs">SELECT CaseType FROM CaseTypes</SQL>
  • External Data Services (EDS): Extend Custom Panel using EDS.
    • Using this we can get data from external data sources using web services.
    • UI fields properties and behavior can be controlled up to some extend
    • Enable Lookup values in dropdown box.
    • Prefil properties with default values based on ClassID, logged in user, parent folder etc.
    • Populate values based on other dropdown list.
    • Behaviour like readonly, mandatory, hidden.
    • Validation of properties
  • Custom Panel does not give us option to add new Action. This could be a significant hurdle for customization.
  • Since it is under Content Navigator platform, we can leverage all ICN customization options.

Tuesday, July 16, 2013

Export to Excel in Java


Export to Excel is one of the common feature in a typical web based application. There are many approaches to accomplish it. The approach which I am proposing does not need any third party library to export to excel. It used XML based excel file. Means it would be a plain text (xml). No need for any office API or third party API.

 Create a JSP page(ExportToExcel.jsp) for exporting data to Excel.  Source page will direct to ExportToExcel.jsp page.

Set appropriate Content Type and Header in ExportToExcel.jsp file.
response.setContentType("application/vnd.ms-excel");
        response.setHeader("Content-Disposition", "attachment; filename=ExcelFile.xml"); 
Output excel file would be ExcelFile.xml. You can change file name as per your need. However file extension should be "xml". Though it's extension is XML, window OS will treat it as Excel file based on the content of the file. We will see that below.
"attachment": this option will let user download excel file. If you choose to open excel file then change "attachment" to "inline".

Windows OS will treat xml file as excel based on  in XML content.
In the below example has 13 columns. All the rows are generated in for loop.


Wednesday, April 24, 2013

FileNet CE Service Client for Kerberos

Implementing Kerberos for FileNet CE service is complicated that what I thought. That's the reason I put together a set of rules for creating client to access CE Web Service. Scope of the blog is create .Net web app to access CE Web Service. It does not talk about server side Kerberos configuration


Application Pool setup:
·         Managed Pipeline Mode: Integrated
·         Identity: NetworkService

 Enable Windows Authentication on IIS App:
·         In IIS, double click on Authentication icon.
·         Enable Windows Authentication. Disable all other type of authentications.


Add below entries in web.config
·         authentication mode=”Windows”
·         identity impersonate=”true”


The server on which the ASP.NET app runs must have delegation enabled.
·         When using "Active Directory Users and Computers" tool, the steps are as follows:
o   Locate the server in the domain tree (or use Find) and open its Properties window.
o   Open Delegation tab
o   Enable "Trust this computer for delegation to any service (Kerberos only)" option, or be more specific and select "Trust this computer for delegation to specified services only > User Kerberos only" and then add some targets.
Note: The above operation must be performed by a domain admin.


IE browser settings:
·         Enable Windows Authentication:
o   Tools à Internet Options à Advanced
o   Under Security Section, check Enable Integrated Windows Authentication.

·         Add CE Server in trusted Sites:
o   Tools à Internet Options à Security à Local Intranet
o   Click on Sites. In popup window, click on Advanced button. Add CE Server name.  http:// CE Server Name


Code to Add Kerberos Token:
Along with every request, send Kerberos ticket. Below is the sample code for the same.
                SoapContext soapContext = Binding.RequestSoapContext;
                //Delete tokens if already exist
                if(soapContext.Security.Tokens.Count > 0){
                soapContext.Security.Tokens.Clear();
                }
                String spnName = "<>";
                SecurityToken token = new KerberosToken(spnName);
                soapContext.Security.Tokens.Add(token);

Monday, April 22, 2013

Run Eclipse project in command line


Steps to create a sample project in Eclipse and execute in command line;
  1. Create Eclipse project and compile it. It will create output in bin folder, which will have .class files.
  2. Create a batch file for classpath. In this batch file create set classpaths for all jar files which are used in Eclipse project. Also set classpath to bin folder of eclipse project.
  3. Copy all the required resources in bin folder. In my example, I had to copy "WcmApiConfig.properties" file in bin folder.
  4. Now you can execute Main class using Java Main Class.
  5. See sample batch file for setting classpath and executing the file.
   
Sample batch file for ClassPath
SET BaseFolder=C:\Users\Administrator\workspace\MyLearning01\
Set CLASSPATH=%CLASSPATH%;%BaseFolder%bin\;
Set CLASSPATH=%CLASSPATH%;%BaseFolder%lib\MyFirstJar.jar;
Set CLASSPATH=%CLASSPATH%;%BaseFolder%lib\MySecondjar.jar;


Sample batch file for the main class:
java eshu.learning01.MyMainClass


Thursday, December 29, 2011

How to preview various documents in Silverlight Application:

I had to display various documents for preview in my Silverlight application. All the file data is stored in database. We do not want to store these files in File System. This is to make sure that this will not come and byte us when we choose Cloud. I spent enough time in googling. Finally I found out below two solutions:
   1. IFrame or DIV in silverlight application
   2. Use RadHtmlPlaceHolder telerik control.
  
I found RadHtmlPlaceHolder control more flexibile and easy to implement.

Here are the steps for my POC:
I had to display various documents in my Silverlight application. All the file data is stored in database. We do not want to store these files in File System. This is to make sure that this will not come and byte us when we choose to use in Cloud. I spent enought time in googling. Finally I found out below two solutions:
   1. IFrame or DIV in silverlight application
   2. Use RadHtmlPlaceHolder telerik control.
  
I found RadHtmlPlaceHolder control more flexibile and easy to implement.
Here are the steps for my POC:

Step #1:Create a table in SQL server which will hold file data.

CREATE TABLE [dbo].[FileUpload](
 [Id] [int] IDENTITY(1,1) NOT NULL,
 [FileName] [varchar](50) NULL,
 [FileContent] [varbinary](max) NULL,
 [ContentType] [varchar](50) NULL,
 CONSTRAINT [PK_FileUpload] PRIMARY KEY CLUSTERED
(
 [Id] ASC
)WITH (PAD_INDEX  = OFF, STATISTICS_NORECOMPUTE  = OFF, IGNORE_DUP_KEY = OFF, ALLOW_ROW_LOCKS  = ON, ALLOW_PAGE_LOCKS  = ON) ON [PRIMARY]
) ON [PRIMARY]


  • File Name: File name
  • File Content: Stored file content in VarBinary. For front end(C#) code it would be array of bytes.
  • Content Type: Store type of the file. Example: PDF, JPG, PNG, etc.
Note: Write a tool to save some sample files in database. This code is out of scope for this blog. You may google for this.

Step #2:
Create a stored procedure to read File data from database.
CREATE Procedure [dbo].[GetFile]
 @Id int
AS
 Begin

  Select top 1 FileContent from  [FileUpload] where id=@id
End
The above stored procedure will read a document based on document id.

Step #3:
Create an .ASPX page for preview document on the screen. This page will be used as source for RadHtmlPlaceHolder control.
Write a method to read File content from database:
 public byte[] GetDocument(int docId)
        {
            byte[] result = null;

            using (SqlConnection aspnetDbConnection = new SqlConnection(ConnectionString))
            {
                SqlCommand command = aspnetDbConnection.CreateCommand();
                command.CommandType = CommandType.StoredProcedure;
                command.CommandText = "GetFile";
                SqlParameter paramFileName = new SqlParameter("@Id ", docId);

                command.Parameters.Add(paramFileName);
                aspnetDbConnection.Open();
                result = (byte[]) command.ExecuteScalar();
            }

            return result;
        }

Create below two methods in .ASPX code behind.
  // Declare this variable to hold document Id
  int docId;

  //This is Page Load event of ASPX page
        protected void Page_Load(object sender, EventArgs e)
        {
   // Read querystring of document id. This querystring is passed from Silverlight page
            docId = Convert.ToInt32(Request.QueryString["docid"]);

   LoadDocumentPDF();
           
        }


        void LoadDocumentPDF()
        {
            DocumentsService service = new DocumentsService();
   // Call GetDocument method to read byte[] of the required document
            byte[] buffer = service.GetDocument(docId);

   // Provide content type information here. In this case I know the content type is PDF. This content type can be many types. For example JPG, DOC, PNG etc
            Response.ContentType = "application/pdf";
            Response.AddHeader("content-length", buffer.Length.ToString());
            Response.BinaryWrite(buffer);


        }

Step #4:
Now its time to write some code in Silverlight.
Add RadHtmlPlaceholder control in XAML file:

< telerik:RadHtmlPlaceholder x:Name="TheHtmlPlaceHolder" Grid.Row="1" RespectSilverlightLayoutMeasure="True" >< /telerik:RadHtmlPlaceholder >

In code behind, paste below two lines to display required document. At this moment, I have hard coded Document Id to "2". In read document Id should be dynamic.

 Uri uri = new Uri("http://localhost:2233/DocumentViewer.aspx?docid=2", UriKind.RelativeOrAbsolute);
TheHtmlPlaceHolder.SourceUrl = uri;